Thursday, September 05, 2013

OS X Mountain Lion cannot delete sparsebundles containing over 262,144 bands (2TB+)

Working on my primary Mac reminds me of working on cheap old plumbing. I'd start out fixing one piece, then another would break, then I'd fix that, then I'd start swearing and banging and I'd break something else...

I haven't done plumbing for a long time, but every year or two I have to fix something big on my main machine and, in the process, other things break. 

This year's breakdown began when my 2009 iMac's 2nd 1TB drive started to fail (The SSD replacement is in the queue.). Next, after cloning the primary drive to an external firewire drive, I noticed an old Permissions bug I've probably ignored for years. Sophos Antivirus didn't seem to like the clone, and I decided it wasn't worth the bother anyway, which led me to Sophos uninstall heck (mostly missing documentation). Next building a Mountain Lion Install SD card for my new SSD exposed weird behaviors of the ML Installer.

I was ready for a break when my SSD came and Mountain Lion 10.8.4 installed nicely (alas, it brought me iTunes 11 as well. I was trying to stay on 10). I decided it was a good time to move my iTunes Library to an external firewire drive. That meant I needed to make some room. No problem, I could just delete a 2.4TB Carbon Copy Cloner sparsebundle...

Cue the shark music. I'll put the details below the fold, but OS X cannot delete sparsebundles with large numbers of bands. The best explanation, and the only plausible solution, were this Mac OX Hints article and its comments ...

Script to delete huge sparsebundle images - Mac OS X Hints

... for i in {0..1000000}; do rm -rv /Volumes/Video1/deleteme.sparseimage/bands$(printf "%x" $i); done ...

... This is a pretty common issue, and a very frustrating one because the error isn't clear. Wildcards in the command line expand, which if you have 250,000 files in a directory means you are sending:

rm file1 file2 file3 ... file250000

That's where you get too many arguments from. (It's also technically a kernel-level error, not a bug with rm; see link below)...

and see ...

osx - OS X - argument list too long for rm -rf *, 4000 files - Super User

I tried getconf ARG_MAX and the limit for Mountain Lion is 262,144. Unfortunately an Sparsebundle band is about 8MB, and 2.4TB means 314,572 bands -- over the Mountain Lion ARG_MAX limit. When I tried to delete Mountain Lion sat calmly, without much change to Activity Monitor or Console, then a beachball began to spin, then the machine quietly and completely died (actually, in one instance a background app continued to work). The bug [2] kills OS X deep in its BSD Unix heart.

So what did I do to delete this undeletable monster?

Well, I think if I'd understood the problem early on [1], I might have had some luck with " for i in {0..1000000}; do rm -rv...". However, there were two additional contributing factors. One was that this was an encrypted sparsebundle; but the bigger one was that by the time I got to the best fix I'd tortured the file a dozen different ways. I had to move data off the drive to other storage, reformat the drive, then move it back.

I can't wait for my next misadventure. In the interests of anyone searching on this general topic, here are some of the things I found along the way:

- fn -

[1] If I had started by searching my own blog post archives I'd have found the solution immediately: OS X Limitations: working around deletion of large numbers of files (time machine image) 7/2012. Stupidly I used Google, which doesn't favor my posts.

[2] Apple fails this test so many ways. The Unix limitation, the ability to create sparse bundle images that can't be deleted, the lack of error handling, the lack of diagnostic messages, etc. That's on top of the many other problems with deleting files and emptying the trash (permissions, locks, etc).

Update 9/6/2013: This is so weird I can only report it for what it's worth. OS X wouldn't 'mount' the disk in order to format it. I think I had to first format it as FAT before I could format it as HPFS.

Monday, September 02, 2013

Downloading a fresh copy of Mountain Lion Installer and using Lion DiskMaker to create an SD card boot drive

Today, in preparation for a 1TB SSD install following the demise of my 2nd 1TB Samsung 2009 iMac boot drive, I created a Mountain Lion 10.8.4 installer disk:

SDInstaller 

The process was more difficult than I'd expected, with some of the same Mountain Lion install problems I'd experienced during my original migration from Snow Leopard. The process of downloading and retaining the Mountain Lion Installer was particularly obscure, and none of the web references I read were entirely correct.

At this point I'd normally be railing about Apple, but it's clear they're as bewildered by the end of physical media distribution (DVD in this case) as the rest of us. (Though they certainly could have made SD distribution more palatable.) As I traced through the process I could see how Apple has been iterating on ML delivery over the past 8 months. Maybe things will go better with Mavericks.

After I was done with this process I did find Apple's official description, hidden in an obscure and mis-titled technical document ...

 OS X: About OS X Recovery

... If you completed your installation of OS X, your installer may have been removed after your successful first login to OS X Lion or OS X Mountain Lion. Mac App Store's Purchases page should show Install OS X as being "Installed", and disallow its download, when viewed from a computer running OS X.

To redownload the installer on a computer running OS X Lion or OS X Mountain Lion, press and hold the Option key while you click the Purchases tab. If the button to the right of the Install OS X Lion or OS X Mountain Lion item doesn't change to "Install" and allow you to download OS X, use Spotlight to search for "Install OS X Lion or OS X Mountain Lion" on your computer.

Launch the Install OS X Lion or OS X Mountain Lion installer you downloaded from Mac App Store. The installer should be in the /Applications folder. Follow the onscreen instructions to complete the OS X installation. Be sure you install Lion on the external storage device you've connected for this purpose, not your computer's boot drive. When installation to your external device is complete, you can re-run Install Mac OS X Lion or OS X Mountain Lion installer and upgrade the boot drive of your computer. A Recovery System will likely not be created, but if you need to reinstall or repair your boot drive at a later date, you can connect the external drive you just prepared and hold Command-R while restarting computer in order to boot from the external Recovery System.

Did you get that? Yes, the damned option key again - though as of 9/2013 the installer showed me a download button. They're wrong about this though: "The installer should be in the /Applications folder". Things are ... more complex. Even a bit astonishing.

I'll describe what I did today, though at the rate things are changing this advice is probably only good for a week or two. I was guided by bits and pieces of these additional references:

The last of these, when combined with Apple's OS X: About Recovery Disk Assistant is a pretty good guide to what the Apple recommended (normal) route would be for installing Mountain Lion from the App Store on new boot media (HDD, SDD, etc). Here's via1083's explanation in the case of a fresh SSD install.
  1. Before installing run Apple Software Update to make sure that you have the latest software.
  2. Download the OS X Recovery Disk Assistant. This will allow you to create a bootable Recovery partition on a USB thumb drive that will allow you to reinstall OS X Mountain Lion. You need to have at least 1GB of space on your USB drive. For more information, including how to properly set up a USB thumb drive, visit About OS X Recovery Disk Assistant.
  3. Shut Down your Mac and connect the USB stick that you prepared with the Recovery assistant to your Mac.
  4. Turn on your Mac and hold the option key. Select the Recovery USB thumbdrive as the boot up disk. Make sure that the computer successfully boots up to it.
  5. Exit the Recovery USB by going to the Apple icon and selecting shutdown. Disconnect the USB thumbdrive.
  6. Proceed to upgrade your MacBook Pro with the SSD drive.
  7. Before turning on your Mac, re-connect your Recovery USB thumbdrive.
  8. Turn On your Mac, hold the "option" key and boot from the USB thumbdrive.
  9. When the OS X recovery tools menu appears, select the Disk Utility Options.
  10. Follow Kappy's tips on SSD drive preparation.
  11. Quit Disk Utility.
  12. In the OS X recovery tools menu select the "Install OS X" option.
  13. Follow the instructions of the installer and agree with the terms and conditions, OS X will then proceed to the downloaded from Apple's servers. (This may take a while depending on your Internet connection's speed. Also, the computer will send its serial number to the Apple servers to validate the copy of OS X Mountain Lion.)
  14. OS X Mountain Lion will proceed to install. This process will take some time, your Mac will reboot once installation is finished.
  15. Follow the OS X set up assistant instructions after your Mac boots from installation.
  16. Done! Proceed to install the rest of your Apps and restoring your documents if you use a back up solution
That's not the route I took though. I created a Mac OS X Installer SD using Lion DiskMaker.
 
First though I wanted a fresh copy of Mountain Lion. That turned out to be ... weird. I won't go through all the twists and turns but there's one key thing to know that I've not seen documented anywhere else:
  • If you have a version of Install OS X Mountain Lion.app in range of Spotlight the App Store install process with update that version rather than create a new version in /Applications.
Yeah, that is hard to believe. But look at the log file I dug up from the installer (edited here, emphases mine, note the use of the tmpdir during install, I was using a purpose-created admin account I called 'temp'):
 

Sep  2 08:04:51 SaintPaul-2.local Install OS X Mountain Lion[5079]: @(#)PROGRAM:Install  PROJECT:Install-735

Sep  2 08:04:51 SaintPaul-2.local Install OS X Mountain Lion[5079]: @(#)PROGRAM:IA  PROJECT:InstallAssistant-360.1

Sep  2 08:04:51 SaintPaul-2.local Install OS X Mountain Lion[5079]: Hardware: iMac11,1 @ 2.66 GHz (x 4), 8192 MB RAM

Sep  2 08:04:51 SaintPaul-2.local Install OS X Mountain Lion[5079]: Running OS Build: Mac OS X 10.8.4 (12E55)

Sep  2 08:04:51 SaintPaul-2.local Install OS X Mountain Lion[5079]: Env: PATH=/usr/bin:/bin:/usr/sbin:/sbin

Sep  2 08:04:51 SaintPaul-2.local Install OS X Mountain Lion[5079]: Env: TMPDIR=/var/folders/js/329jxxks1gx77q7n_62bg6fh0000gq/T/

Sep  2 08:04:51 SaintPaul-2.local Install OS X Mountain Lion[5079]: Env: SHELL=/bin/bash

Sep  2 08:04:51 SaintPaul-2.local Install OS X Mountain Lion[5079]: Env: HOME=/Users/temp

Sep  2 08:04:51 SaintPaul-2.local Install OS X Mountain Lion[5079]: Env: USER=temp

Sep  2 08:04:51 SaintPaul-2.local Install OS X Mountain Lion[5079]: Env: LOGNAME=temp

Sep  2 08:04:51 SaintPaul-2.local Install OS X Mountain Lion[5079]: Env: SSH_AUTH_SOCK=/tmp/launch-aetmfB/Listeners

Sep  2 08:04:51 SaintPaul-2.local Install OS X Mountain Lion[5079]: Env: Apple_Ubiquity_Message=/tmp/launch-suN6EE/Apple_Ubiquity_Message

Sep  2 08:04:51 SaintPaul-2.local Install OS X Mountain Lion[5079]: Env: Apple_PubSub_Socket_Render=/tmp/launch-NTelRv/Render

Sep  2 08:04:51 SaintPaul-2.local Install OS X Mountain Lion[5079]: Env: COMMAND_MODE=unix2003

Sep  2 08:04:51 SaintPaul-2.local Install OS X Mountain Lion[5079]: Env: __CF_USER_TEXT_ENCODING=0x1F7:0:0

Sep  2 08:04:58 SaintPaul-2.local Install OS X Mountain Lion[5079]: Using distribution archive from /Users/jfaughnan 1/Public/AppInst/Mac App install/OSUpdates/Install OS X Mountain Lion.app/Contents/SharedSupport/OSInstall.mpkg

Sep  2 08:04:58 SaintPaul-2.local Install OS X Mountain Lion[5079]: Configuring products from SharedSupport folder

Sep  2 08:04:58 SaintPaul-2.local Install OS X Mountain Lion[5079]: Using product <OSInstallDVDProduct> based on media at /Users/jfaughnan 1/Public/AppInst/Mac App install/OSUpdates/Install OS X Mountain Lion.app/Contents/SharedSupport at distance 5...

 
Yes, the installer found an older version of Install OS X Mountain Lion and updated it rather than create a new app in /Applications.
 
Ok, now that you've got your head around this behavior,  here's an expanded version of what I posted to Ask Different.
  1. As of 9/2013 the app store lets us download multiple instances of Mountain Lion without necessarily clicking on the option key to get the Download button to appear.
  2. Lifehacker recommends downloading from a fresh purpose-created app store account. I suspect that's because they ran into the update behavior using an account with access to a prior ML download. I did this, but not sure it's necessary.
  3. After the 4.4 GB download completed I quit the installer. Since the installer had located /Users/jfaughnan 1/Public/AppInst/Mac App install/OSUpdates/Install OS X Mountain Lion.app/Contents/SharedSupport/OSInstall.mpkg it updated that package [1]. I think if it hadn't found that prior installer it would have generated an install app and stored it in /Applications.
Once I figured out what had happened I used Lion DiskMaker to create the ML installer on an 8GB SD card. It works by mounting InstallESD.dmg and BaseSystem.dmg then creating  the boot and ESD components on the SD card.
 
After completion I tried holding down the option key on restart -- with a wireless Bluetooth keyboard. That didn't work, in fact I ended up with a familiar no mouse kb startup that resolved when I disconnected my firewire connected Epson scanner. I then used Startup Disk.app to choose the SD boot disk and I confirmed it worked.

So now I'm ready for the replacement SSD drive to arrive.

- fn -

[1] Spotlight found that installer even though it was in a different user account because it was in a shared folder.

Update 10/30/2013: @gaelicwizard explained the Spotlight-updating-Installer behavior in an app.net thread. This is simply how the app store updater works -- the app being updated doesn't have to be in the Applications folder. Nothing special about the OS X Installer.

Sunday, September 01, 2013

Uninstalling Sophos Antivirus version 9 for Mac - the web site documentation is incorrect

[It's undocumented, but after I wrote this I discovered the Antivirus 9 install puts an app called 'Remove Sophos Anti-Virus' in the Applications folder.]

---------

In a moment of madness, I installed Sophos Antivirus.

Forgive me, I have sinned. It's a mess.

Unfortunately, the online documentation for version 9 removal is incorrect: Using the Terminal to install or remove Sophos Anti-Virus for Mac OS X. 'Remove Sophos Anti-Virus.pkg' no longer exists and there's no longer a GUI uninstaller.

Instead you have to run remove_v9.sh. I tried to do that from my Admin account -- but that failed. You have to run it from the account it was installed from, even though this app is a root install and the original user account might not be an admin account. This worked from my non-admin account in OS X Mountain Lion where Admin is my Administrator account:

jfaughnan$ su Admin Password: bash-3.2$ cd /Library/Sophos\ Anti-Virus bash-3.2$ sudo /Library/Sophos\ Anti-Virus/remove_v9.sh Password:

I got this ...

WARNING: this script permenantly removes Sophos Anti-Virus for Mac version 9 it should NOT be used on a version 8 installation

if there are errors reported by this script, run it again (it fixes itself)

press control-C now to abort (automatically continues in 5 seconds) run with -f (next time) to skip the 5 second delay ..... removing launchagent com.sophos.uiserver for user 502 removing /Library/LaunchAgents/com.sophos.uiserver.plist stopping Sophos Anti-Virus.app removing /Applications/Sophos Anti-Virus.app removing /Library/Sophos Anti-Virus removing /Library/Frameworks/SAVI.framework removing /Library/Frameworks/SUMScanKit.framework removing /Library/Application Support/Sophos removing /Library/Caches/com.sophos.sav removing /Library/Caches/com.sophos.sau removing /Library/Preferences/com.sophos.sau.plist removing /usr/bin/SophosUpdate removing /usr/bin/sweep done error: leftover path /Library/Caches/com.sophos.installer/ needs to be removed error: leftover path /Library/Caches/com.sophos.sxld/ needs to be removed bash-3.2$

 It didn't "fix itself", but I removed the residual paths manually. From an earlier failed effort I suggest also checking (Library is not user Library, it's root):

error: leftover path /Applications/Sophos Anti-Virus.app/ needs to be removed error: leftover path /Library/Frameworks/SAVI.framework/ needs to be removed error: leftover path /Library/Frameworks/SUMScanKit.framework/ needs to be removed error: leftover path /Library/Sophos Anti-Virus/ needs to be removed error: leftover path /Library/Caches/com.sophos.installer/ needs to be removed error: leftover path /Library/Caches/com.sophos.sau/ needs to be removed error: leftover path /Library/Caches/com.sophos.sav/ needs to be removed error: leftover path /Library/Caches/com.sophos.sxld/ needs to be removed error: leftover path /Library/LaunchAgents/com.sophos.uiserver.plist needs to be removed

What a mess.

Don't like your OS X user name? Set an alias.

On one of our machines the admin account is Admin/Administrator, on another it's admin/Administrator, and on a third it's Kateva. Very annoying, wish I'd been consistent. Today I learned I could just set an alias that's easy to type when needed.

Works great. Nice tip.

Update 9/2/2013: I was thinking about this in the context of OS X Migration Assistant. I wonder if there are issues when an Alias matches an account name on the target Mac. The same problems might occur with Time Machine restores. So I'll use this feature cautiously, and consider removing aliases prior to doing a migration.

Permissions bug in OS X: Fetching forever - SOLVED with Workgroup Manager (Bonus: Reset user account permissions with passwordreset.app)

See the update for how I finally solved this bug.

-

This is apparently a longstanding OS X bug that particularly affects veterans. I noticed it while debugging an odd behavior I noticed after a Carbon Coper Cloner operation.

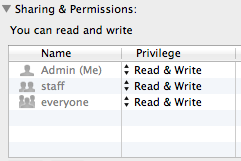
When I look at permissions on some of my Home folder files I see this:

Screen Shot 2013 09 01 at 5 09 15 PM

The Fetching is forever -- OS X is trying to resolve a reference that no longer exists. In a new user account permissions look like this:

Screen Shot 2013 09 01 at 5 11 55 PM

or this ...

 Screen Shot 2013 09 01 at 5 05 44 PM

One cause of the bug is described by jsd2 in a 2011 Apple Discussion thread on the problem:

Newly created users in Leopard, Snow Leopard, and Lion have "staff" as their primary group, but users left over from Tiger have a primary group that has the same name as the username.  In my system, files and folders created by Tiger-originated accounts show the proper ownerships in Terminal, but if you Get Info from Lion's Finder, the Sharing & Permissions section apparently can't find the proper group name, and continues to display "Fetching…"  If I create a new account, it correctly shows "staff" as the group.

I tried creating a Group that matched my short username (jfaughnan) to see if that would fool Mountain Lion into eliminating the "Fetching" message but it had no effect. So, by now deep into this post, I continued on.

Next I used terminal (ls -l) to inspect permissions on one of those Fetching examples (edited a bit here)

drwxr-xr-x@ jfaughnan  502 

The sequence drwxr-xr-x should be read d rwx r-x r-x and it means this is a directory and it can User can read/write/execute, Group can read/execute and World can read/execute.

502 is my system assign UID (not to be confused with more modern UUID, both can be seen in User and Groups Advanced), but it's showing up here where one would expect to see Group ID (GID)

Here's the result for a different account, created, I think, in Snow Leopard

drwxrwxrwx  Admin  staff 

In the 2nd case the GID is able to resolve to one of the Mountain Lion group names, which one can display with $ less /etc/group (or skip to the bottom of this post and check out workgroup manager):

nobody:*:-2: nogroup:*:-1: wheel:*:0:root daemon:*:1:root kmem:*:2:root sys:*:3:root owner:*:10: everyone:*:12: staff:*:20:root _appstore:*:33:utmp:*:45: authedusers:*:50:

In the first case the GID can't resolve to the Group Name, because in Tiger there was a GID set equal to my UID, in this case both were 502 - as jsd2 described above.

Now, at this point you might ask a dangerous question. You might point out that ls -l is only showing ONE GID/GroupName, but a file in OS X can belong to multiple Groups (these do). Well, cough, I think OS X permissions are broken. Indeed, while SharePoint 2007 was proof that Microsoft was broken, Mountain Lion permissions are proof Apple is broken.

It gets worse. I used the Finder to remove the 'Fetching' line from "Sharing & Permissions" on some of my old files. Doing this did not, as I expected, remove the '502' reference that shows up with ls -l. It made no difference to the ls -l results at all.

Which suggests to me that the real problem can't be exposed with these Unix permission displays. The real issue may well be buried in ACLs, or wherever OS X now keeps track of File-Group relationships. 

Which is where I end, because for me I think this "Fetching" thing isn't causing any real problems. I'll leave with only two additional notes:

- fn -

[1] I believe since Carbon Copy Cloner cloned my original drive this is the same UID I had then; migration assistant would have changed it. See: OSX Tips: Setting-up a new Mac from an old one, its backups, or a PC Problems after using Migration Assistant.

[2] useful Python command: python -c 'import grp; print grp.getgrnam("staff").gr_gid'

See also

Update 9/1/2013: I've solved the Fetching forever bug. It was easy in the end.

This is what I did:

  1. As above, I used ls -l to show me that the unmatched GID associated with the Fetching Forever bug was 502. In my case it was still the same as my UID. (I think ls -l shows one the PRIMARY group associated with a file, whereas Get Info shows all groups.
  2. I used Workgroup Manager 10.8 to create a new Group I called Old502. I could have called it anything. The trick is that Workgroup Manager lets us specify the GID. I gave this group the GID of 502.
  3. Now, instead of Fetching Forever, OS X Get Info shows Old502. Everything is as it should be, at the cost of an extraneous Group that does no harm.

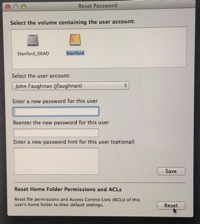
Update 9/2/2013: In the course of another project (future post) I took a look at Apple's occult user account password reset tool.

I ran it from a booted Mountain Lion Install "disk" (SD card) but it might look the same from a Recovery Partition or Recovery Disk restart.  I started terminal and entered resetpassword, and, after a few minutes, I got this (I entered some values):

Repairpermissions

It's a weird and awkward UI and the app is obviously mis-titled and completely undocumented, but it appears that after years of confusing users with Disk Utility's near worthless Repair Disk Permissions there is indeed an official way to repair a user's Home Folder Permissions. I have a Disk Migration operation pending, I'm going to give this a try once the data is in place on  fresh Mountain Lion instance.

Update 9/9/2013: After I used migration assistant to move my accounts to a new system I think the permissions were reset back to the standard. The 502 bug persisted though, after I removed the Group I'd created for GID 502 I got 'Fetching' back again.

Saturday, August 31, 2013

Annals of the unexpected: My 2009 iMac runs better off an external drive than its original (cursed) internal Seagate

This was unexpected -- in a good way. I posted about it on posted about it via Apple Discussions but I'll share a revised post here.

The story begins when my 2009 27" (flickering one) iMac's second 1TB Seagate (ST31000528ASQ) made an odd sound two days ago.

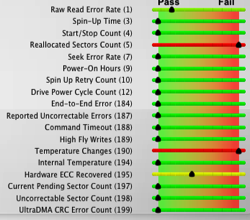
My ears are tuned to those sounds. I've heard them before, they never turn out well. Sure enough, Disk Utility showed a SMART failure. (Many failing drives pass SMART tests, which are pretty damned dumb.) Of course Mountain Lion should put this kind of thing up in the ^%$$# Notification Center -- but it doesn't.

This is what I found using Tech Tools Pro:

TechToolsPro 

So I needed a new drive. I had prior experience to draw from. When the first of these wretched Seagates failed at 1.3 yslowly and painfully, I did an out-of-warrantee Apple store swap for a new version of the same drive (that's how they do repairs). 

Apple charged me $200+ ($40 service, which is a bargain, and $160+ for the drive which was excessive) to put this one in. I was later reimbursed when Apple extended its recall range. I could pay another $200+ to Apple, assuming they'd still service my 4 yo iMac (Apple only keeps parts for the past five years of machines.) Or I could bit the bullet, pay $650 for a 1TB Samsung 840 EVO SATA III SSD, and then pay $240 for FirstTech to work on the disgustingly unserviceable iMac (and fix the thermal sensor problem [1],[2]). With the SSD I'd probably extend the machines useable lifespan another 2 years, and I'd get far higher reliability. The latter is very important to me because I hate this sh*t.

I looked at other options, like just buying a new Mac, but I decided to go with the SSD for the reliability and extended machine usability.

In the meantime I used Carbon Copy Cloner to turn one of my many offsite backup drives into a boot drive [3] and put it in my Firewire 800 Voyager cradle. I then set Mountain Lion to boot off it. The original drive still showed, so I excluded it from Spotlight and Time Capsule then I used Disk Utility to unmount the internal drive.

The clone worked well, except both Google Drive and Dropbox complained about the change. Dropbox resynchronized, but I deleted by Google Drive files and downloaded a fresh set.

I then sat back and began to wait for the SSD. I figured I'd put it in a firewire enclosure and run off it for a few weeks before paying for the install. Test it out first.

Except something odd happened.

My machine is faster with the external drive than the old internal Seagate. Aperture in particular is significantly faster. I didn't expect that, though it is true that the 7,200 rpm ST31000528ASQ was an infamous dog in 2009. Maybe seek times were the rate limiting step after all. Maybe HPFS benefits from defragmentation after all.

Not only is my machine faster, it's also terribly quiet. The cradle is several feet away, and hard to hear. Without an internal drive the Mac fans barely spin. It's eerie.

I hadn't considered this option. There's not much downside; I have a string of firewire devices anyway so there's no new clutter. Repair and storage upgrades couldn't be easier.

Maybe I'll return the SSD. Meanwhile, if you have a 2009 iMac with a dying internal drive, I recommend running off a decent Firewire 800 external HDD and a quality enclosure. You may be quite happy and you can save some money and hassle. You'll also be adopting the "trash can" Mac Pro model of external storage early ....

- fn -

[1] The original drive has Apple defined firmware that works with this iMac's temperature system. If it's not dealt with fans run full speed. Replacements don't have those. Since SSDs run cool many short out the Apple sensor, FirstTech attaches an Apple stick-on sensor and puts it on the drive.

[2] I could work on but I'd rather bug them about the dust that gets into the designed-by-demon-from-hell iMac screen.

[3] I have lots of backups, but not bootable backups. Going forward I'll make 'em all bootable. Not sure why I didn't before. Since the primary was still working it was easy to do this.

See also

Update 9/1/2013

Post-migration I've had some odd problems with the "Desktop and Screen Saver" preference pane when invoked by Finder context menu "Change Desktop Background..."

  • When I right click on Change Desktop Background the Preference Pane doesn't appear. I have to repeat the action.
  • Background assignments were initially incorrect.
  • I can't add Folders to Desktop selection list and get my additions to stick. 

Some of these problems could be Mountain Lion bugs but I hadn't run into them before. My first move was to run Onyx, often a good idea post cloning - but that had no effect.

Next, since this Preference Pane accesses the iPhoto/Aperture library, which has been problematicbefore, I tried rebuilding the Aperture database (cmd-opt start Aperture) while also running Console both with Aperture and with the Preference Pane. I found this entry:

ScreenSaverEngine[571] unhandled sortKeyPath: exifProperties.Model for album: <AP2012_RKAlbum: 0x7fdb784b1740 > modelId = 2054, uuid = 'V66V3qagTSKg6rEeRpP7XQ' name='(null)', displayName='Christmas 2012'

'Christmas 2012' is an Aperture Project/Event, not an Album. I moved the images into a new album and deleted the old one. That cleared the error message. Note rebuilding Aperture's database didn't clear the bug, going forward I'll be using Console quite often with Aperture - a buggy app useable only by geeks. I also deleted my preferences 

I thought things were smoother, but the delay still persisted. This time Console said:

no information back from LS about running process

This Console message has been reported when apps fail to launch. I believe LS means "Launch Services". That makes sense of course. I'd previously asked Onyx to rebuild launch services but I decided to give it another try. Alas, no joy.

i'm still digging ...

Update 9/1/2013

Some mixture of Carbon Copy Cloner, Mountain Lion and perhaps Sophos Antivirus has taken my OS to a place I cannot follow. I suspect Permissions (cause I hate them).

It mostly works, but now I get

9/1/13 8:55:58.751 PM Dock[682]: no information back from LS about running process

Sometimes Mission Control dies, and I get a weird variety of Desktop background behaviors and two tries to start the "Desktop and Screen Saver" preference pane.

Once I get the new SSD I'll set it up with a fresh Mountain Lion install, then try using Migration Assistant to move my user accounts over to the new system.

Kiosk mode browser for Mac - not many options

For reasons related to special needs adolescence I researched the use of a kiosk-mode browser on a Mac.

The short answer is - there are no free options. There's not much of a market for this on OS X, and even browsers that support kiosk mode on Windows 7 don't do it on a Mac. Opera used to support kiosk mode in OS X, but the available documentation is out of date and when I tried the kiosk mode command was not recognized. (Opera for Mac is basically dead.) 

Several older posts mention Saft for Safari -- that product has been abandoned and doesn't run in modern Safari.

eCrisper for Mac is not in the app store, but it is still sold for $79 with a very restrictive license. Since it's not in the app store I would worry about Mountain Lion compatibility.

Running Chrome with extension in kiosk mode, particularly if combined with SimpleFinder and single app execution might come close for some purposes.